Kubernetes 执行器
注意
从 Airflow 2.7.0 版本开始,你需要安装 cncf.kubernetes provider 包才能使用此执行器。可以通过安装 apache-airflow-providers-cncf-kubernetes>=7.4.0 或通过安装 Airflow 时包含 cncf.kubernetes 附加项来完成:pip install 'apache-airflow[cncf.kubernetes]'。
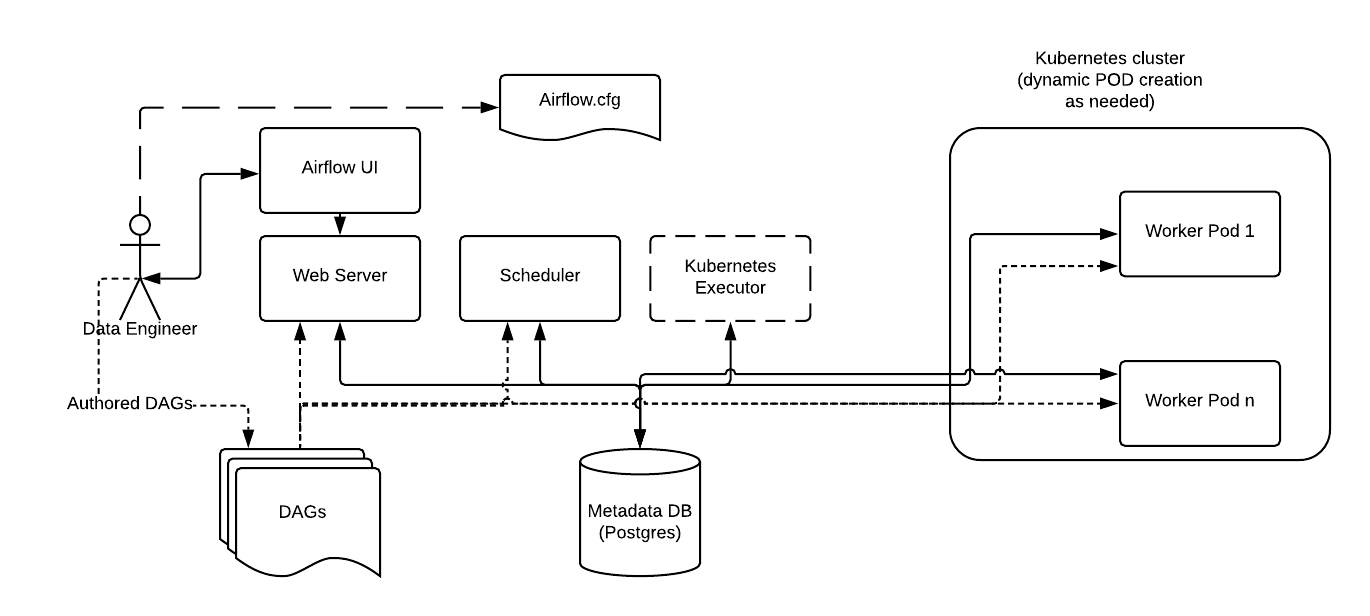
Kubernetes 执行器在 Kubernetes 集群上为每个任务实例运行一个单独的 pod。
KubernetesExecutor 作为 Airflow Scheduler 中的一个进程运行。调度器本身不一定需要在 Kubernetes 上运行,但需要访问 Kubernetes 集群。
KubernetesExecutor 需要后端使用非 sqlite 数据库。
当 DAG 提交任务时,KubernetesExecutor 会向 Kubernetes API 请求一个 worker pod。然后 worker pod 运行任务,报告结果,并终止。

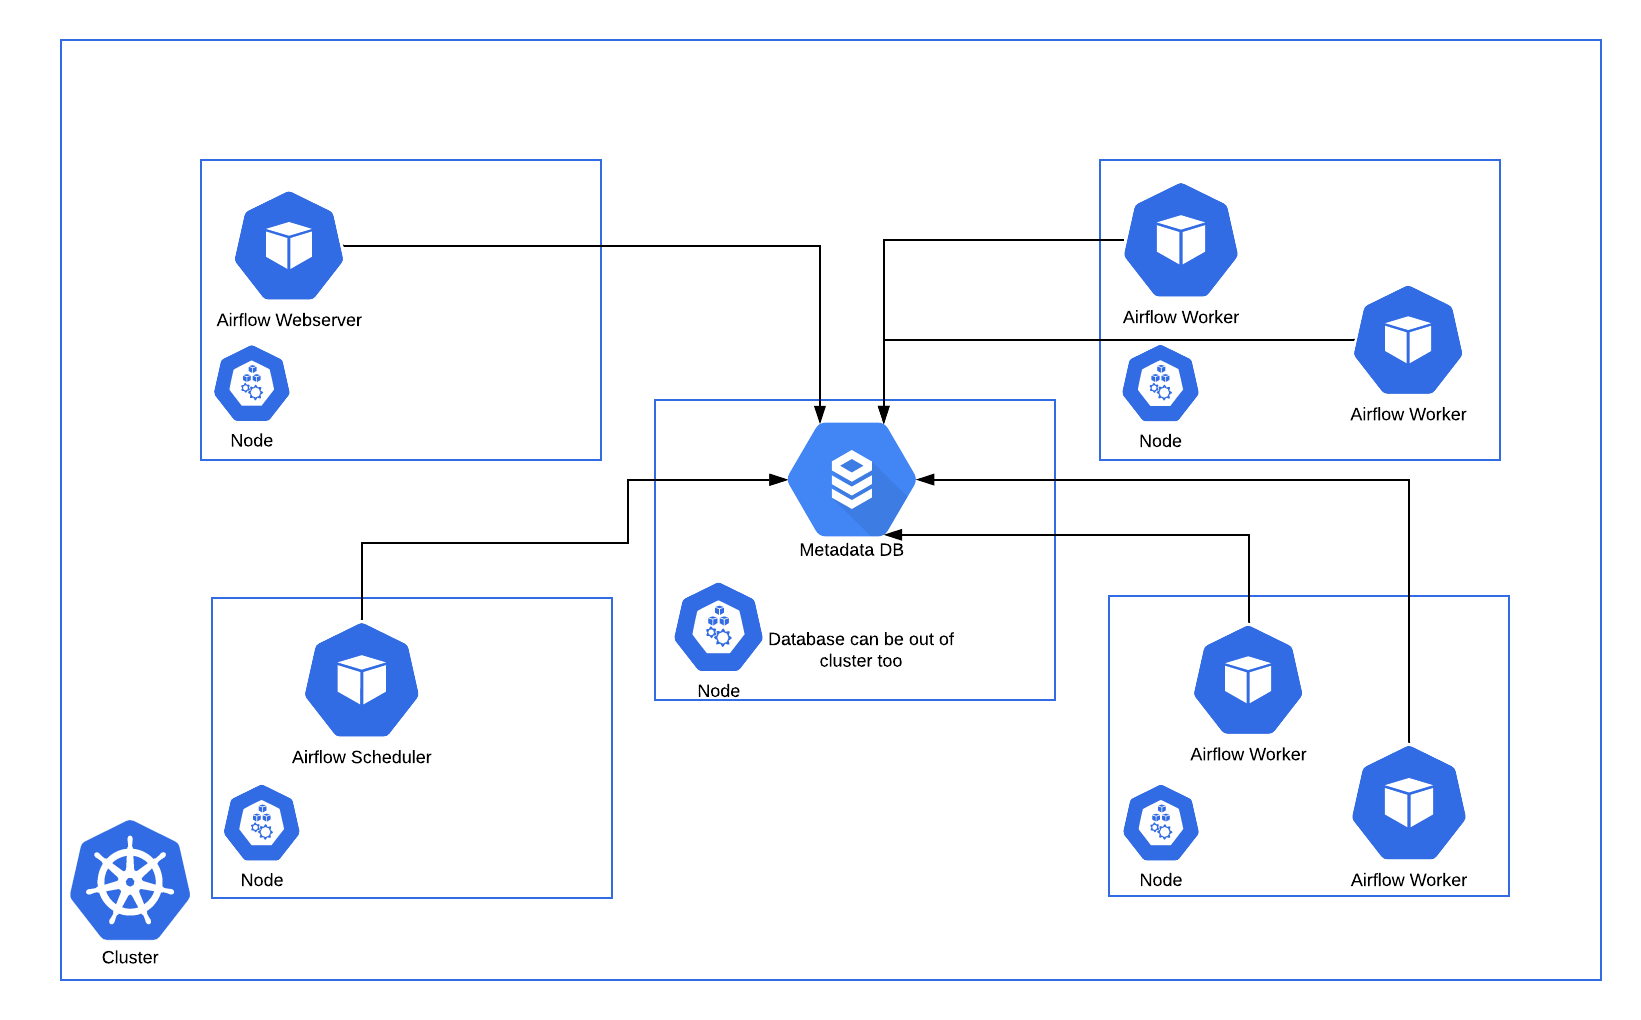
下面显示了一个在 Kubernetes 集群的五个分布式节点上运行的 Airflow 部署示例。

与常规 Airflow 架构一致,Worker 需要访问 DAG 文件以执行这些 DAG 中的任务并与元数据仓库交互。此外,需要在 Airflow 配置文件中指定 Kubernetes 执行器特有的配置信息,例如 worker namespace 和镜像信息。
此外,Kubernetes 执行器还允许使用 Executor config 对每个任务指定附加功能。

配置
pod_template_file
为了自定义用于 k8s 执行器 worker 进程的 pod,你可以创建一个 pod 模板文件。你必须在 airflow.cfg 的 kubernetes_executor 部分的 pod_template_file 选项中提供模板文件的路径。
Airflow 对 pod 模板文件有两个严格的要求:基础镜像和 pod 名称。
基础镜像
pod_template_file 必须在 spec.containers[0] 位置有一个名为 base 的容器,并且必须指定其 image。
你可以在此必需容器之后自由创建 sidecar 容器,但 Airflow 假定 airflow worker 容器存在于容器数组的开头,并假定该容器名为 base。
注意
Airflow 可能会覆盖基础容器 image,例如通过 pod_override 配置;但它必须存在于模板文件中且不能为空白。
Pod 名称
必须在模板文件中设置 pod 的 metadata.name。此字段在启动 pod 时总是会被动态设置,以保证所有 pod 的唯一性。但再次强调,它必须包含在模板中,且不能为空白。
示例 pod 模板
考虑到这些要求,以下是一些基本的 pod_template_file YAML 文件示例。
注意
下面的示例在使用默认 Airflow 配置值时应该可以工作。但是,许多自定义配置值也需要通过此模板显式地传递给 pod。这包括但不限于 sql 配置、必需的 Airflow 连接、DAGs 文件夹路径和日志设置。详细信息请参见 Configuration Reference。
将 DAGs 存储在镜像中
---
apiVersion: v1
kind: Pod
metadata:
  name: placeholder-name
spec:
  containers:
    - env:
        - name: AIRFLOW__CORE__EXECUTOR
          value: LocalExecutor
        # Hard Coded Airflow Envs
        - name: AIRFLOW__CORE__FERNET_KEY
          valueFrom:
            secretKeyRef:
              name: RELEASE-NAME-fernet-key
              key: fernet-key
        - name: AIRFLOW__DATABASE__SQL_ALCHEMY_CONN
          valueFrom:
            secretKeyRef:
              name: RELEASE-NAME-airflow-metadata
              key: connection
        - name: AIRFLOW_CONN_AIRFLOW_DB
          valueFrom:
            secretKeyRef:
              name: RELEASE-NAME-airflow-metadata
              key: connection
      image: dummy_image
      imagePullPolicy: IfNotPresent
      name: base
      volumeMounts:
        - mountPath: "/opt/airflow/logs"
          name: airflow-logs
        - mountPath: /opt/airflow/airflow.cfg
          name: airflow-config
          readOnly: true
          subPath: airflow.cfg
  restartPolicy: Never
  securityContext:
    runAsUser: 50000
    fsGroup: 50000
  serviceAccountName: "RELEASE-NAME-worker-serviceaccount"
  volumes:
    - emptyDir: {}
      name: airflow-logs
    - configMap:
        name: RELEASE-NAME-airflow-config
      name: airflow-config
将 DAGs 存储在 persistentVolume 中
---
apiVersion: v1
kind: Pod
metadata:
  name: placeholder-name
spec:
  containers:
    - env:
        - name: AIRFLOW__CORE__EXECUTOR
          value: LocalExecutor
        # Hard Coded Airflow Envs
        - name: AIRFLOW__CORE__FERNET_KEY
          valueFrom:
            secretKeyRef:
              name: RELEASE-NAME-fernet-key
              key: fernet-key
        - name: AIRFLOW__DATABASE__SQL_ALCHEMY_CONN
          valueFrom:
            secretKeyRef:
              name: RELEASE-NAME-airflow-metadata
              key: connection
        - name: AIRFLOW_CONN_AIRFLOW_DB
          valueFrom:
            secretKeyRef:
              name: RELEASE-NAME-airflow-metadata
              key: connection
      image: dummy_image
      imagePullPolicy: IfNotPresent
      name: base
      volumeMounts:
        - mountPath: "/opt/airflow/logs"
          name: airflow-logs
        - mountPath: /opt/airflow/dags
          name: airflow-dags
          readOnly: true
        - mountPath: /opt/airflow/airflow.cfg
          name: airflow-config
          readOnly: true
          subPath: airflow.cfg
  restartPolicy: Never
  securityContext:
    runAsUser: 50000
    fsGroup: 50000
  serviceAccountName: "RELEASE-NAME-worker-serviceaccount"
  volumes:
    - name: airflow-dags
      persistentVolumeClaim:
        claimName: RELEASE-NAME-dags
    - emptyDir: {}
      name: airflow-logs
    - configMap:
        name: RELEASE-NAME-airflow-config
      name: airflow-config
从 git 拉取 DAGs
---
apiVersion: v1
kind: Pod
metadata:
  name: dummy-name
spec:
  initContainers:
    - name: git-sync
      image: "registry.k8s.io/git-sync/git-sync:v3.6.3"
      env:
        - name: GIT_SYNC_BRANCH
          value: "v2-2-stable"
        - name: GIT_SYNC_REPO
          value: "https://github.com/apache/airflow.git"
        - name: GIT_SYNC_DEPTH
          value: "1"
        - name: GIT_SYNC_ROOT
          value: "/git"
        - name: GIT_SYNC_DEST
          value: "repo"
        - name: GIT_SYNC_ADD_USER
          value: "true"
        - name: GIT_SYNC_ONE_TIME
          value: "true"
      volumeMounts:
        - name: airflow-dags
          mountPath: /git
  containers:
    - env:
        - name: AIRFLOW__CORE__EXECUTOR
          value: LocalExecutor
        # Hard Coded Airflow Envs
        - name: AIRFLOW__CORE__FERNET_KEY
          valueFrom:
            secretKeyRef:
              name: RELEASE-NAME-fernet-key
              key: fernet-key
        - name: AIRFLOW__DATABASE__SQL_ALCHEMY_CONN
          valueFrom:
            secretKeyRef:
              name: RELEASE-NAME-airflow-metadata
              key: connection
        - name: AIRFLOW_CONN_AIRFLOW_DB
          valueFrom:
            secretKeyRef:
              name: RELEASE-NAME-airflow-metadata
              key: connection
      image: dummy_image
      imagePullPolicy: IfNotPresent
      name: base
      volumeMounts:
        - mountPath: "/opt/airflow/logs"
          name: airflow-logs
        - mountPath: /opt/airflow/dags
          name: airflow-dags
          subPath: repo/airflow/example_dags
          readOnly: false
        - mountPath: /opt/airflow/airflow.cfg
          name: airflow-config
          readOnly: true
          subPath: airflow.cfg
  restartPolicy: Never
  securityContext:
    runAsUser: 50000
    fsGroup: 50000
  serviceAccountName: "RELEASE-NAME-worker-serviceaccount"
  volumes:
    - name: airflow-dags
      emptyDir: {}
    - name: airflow-logs
      emptyDir: {}
    - configMap:
        name: RELEASE-NAME-airflow-config
      name: airflow-config
pod_override
使用 KubernetesExecutor 时,Airflow 提供了按任务覆盖系统默认设置的功能。要利用此功能,请创建一个 Kubernetes V1pod 对象并填写所需的覆盖设置。
要覆盖由 KubernetesExecutor 启动的 pod 的基础容器,创建一个包含单个容器的 V1pod,并按如下方式覆盖字段
airflow/example_dags/example_kubernetes_executor.py
        executor_config_volume_mount = {
            "pod_override": k8s.V1Pod(
                spec=k8s.V1PodSpec(
                    containers=[
                        k8s.V1Container(
                            name="base",
                            volume_mounts=[
                                k8s.V1VolumeMount(mount_path="/foo/", name="example-kubernetes-test-volume")
                            ],
                        )
                    ],
                    volumes=[
                        k8s.V1Volume(
                            name="example-kubernetes-test-volume",
                            host_path=k8s.V1HostPathVolumeSource(path="/tmp/"),
                        )
                    ],
                )
            ),
        }

        @task(executor_config=executor_config_volume_mount)
        def test_volume_mount():
            """
            Tests whether the volume has been mounted.
            """

            with open("/foo/volume_mount_test.txt", "w") as foo:
                foo.write("Hello")

            return_code = os.system("cat /foo/volume_mount_test.txt")
            if return_code != 0:
                raise ValueError(f"Error when checking volume mount. Return code {return_code}")

        volume_task = test_volume_mount()
请注意,以下字段都将被扩展而不是覆盖。来自 spec:volumes 和 init_containers。来自 container:volume mounts、environment variables、ports 和 devices。
要向启动的 pod 添加 sidecar 容器,创建一个包含空的第一容器(名称为 base)和第二个包含所需 sidecar 的容器的 V1pod。
airflow/example_dags/example_kubernetes_executor.py
        executor_config_sidecar = {
            "pod_override": k8s.V1Pod(
                spec=k8s.V1PodSpec(
                    containers=[
                        k8s.V1Container(
                            name="base",
                            volume_mounts=[k8s.V1VolumeMount(mount_path="/shared/", name="shared-empty-dir")],
                        ),
                        k8s.V1Container(
                            name="sidecar",
                            image="ubuntu",
                            args=['echo "retrieved from mount" > /shared/test.txt'],
                            command=["bash", "-cx"],
                            volume_mounts=[k8s.V1VolumeMount(mount_path="/shared/", name="shared-empty-dir")],
                        ),
                    ],
                    volumes=[
                        k8s.V1Volume(name="shared-empty-dir", empty_dir=k8s.V1EmptyDirVolumeSource()),
                    ],
                )
            ),
        }

        @task(executor_config=executor_config_sidecar)
        def test_sharedvolume_mount():
            """
            Tests whether the volume has been mounted.
            """
            for i in range(5):
                try:
                    return_code = os.system("cat /shared/test.txt")
                    if return_code != 0:
                        raise ValueError(f"Error when checking volume mount. Return code {return_code}")
                except ValueError as e:
                    if i > 4:
                        raise e

        sidecar_task = test_sharedvolume_mount()
你还可以按任务创建自定义 pod_template_file,以便在多个任务之间重用相同的基础值。这将替换 airflow.cfg 中命名的默认 pod_template_file,然后使用 pod_override 覆盖该模板。该 pod_template_file 也将用于生成在 Airflow UI 中可见的 Pod K8s Spec。
以下是一个具有这两个功能的任务示例
import os

import pendulum

from airflow import DAG
from airflow.decorators import task
from airflow.example_dags.libs.helper import print_stuff
from airflow.settings import AIRFLOW_HOME

from kubernetes.client import models as k8s

with DAG(
    dag_id="example_pod_template_file",
    schedule=None,
    start_date=pendulum.datetime(2021, 1, 1, tz="UTC"),
    catchup=False,
    tags=["example3"],
) as dag:
    executor_config_template = {
        "pod_template_file": os.path.join(AIRFLOW_HOME, "pod_templates/basic_template.yaml"),
        "pod_override": k8s.V1Pod(metadata=k8s.V1ObjectMeta(labels={"release": "stable"})),
    }

    @task(executor_config=executor_config_template)
    def task_with_template():
        print_stuff()
管理 DAGs 和日志
使用持久卷是可选的,取决于你的配置。
Dags:
要将 DAGs 放入 worker 中,你可以
在镜像中包含 DAGs。
使用
git-sync,它会在启动 worker 容器之前运行一个git pull来拉取 DAGs 仓库。将 DAGs 存储在持久卷上,该持久卷可以挂载到所有 worker 上。
日志:
要从 worker 中获取任务日志,你可以
使用同时挂载到 webserver 和 worker 上的持久卷。
启用远程日志记录。
注意
如果你未启用日志持久化,并且未启用远程日志记录,则 worker pod 关闭后日志将丢失。
与 CeleryExecutor 的比较
与 CeleryExecutor 不同,KubernetesExecutor 不需要额外的组件(如 Redis),但需要访问 Kubernetes 集群。
此外,可以使用 Kubernetes 内置的监控功能来监控 Pod。
使用 KubernetesExecutor,每个任务都在其自己的 pod 中运行。pod 在任务排队时创建,并在任务完成时终止。从历史上看,在诸如可突发工作负载之类的场景中,这比 CeleryExecutor 具有资源利用优势,因为 CeleryExecutor 需要固定数量的长时间运行的 Celery worker pod,无论是否有任务运行。
然而,官方的 Apache Airflow Helm chart 可以根据队列中的任务数量将 celery worker 自动缩减到零,因此在使用官方 chart 时,这不再是一个优势。
使用 Celery worker,你的任务延迟往往会更低,因为在任务排队时 worker pod 已经启动并运行。另一方面,由于多个任务在同一个 pod 中运行,使用 Celery 时你可能需要更注意任务设计中的资源利用,特别是内存消耗。
KubernetesExecutor 有用的一种场景是当你有长时间运行的任务时,因为如果在任务运行时进行部署,任务将一直运行直到完成(或超时等)。但使用 CeleryExecutor,如果你设置了宽限期,任务只会运行到宽限期结束,届时任务将被终止。KubernetesExecutor 适用于的另一种场景是当你的任务在资源需求或镜像方面不是很统一时。
最后,请注意这并非二选一;使用 CeleryKubernetesExecutor,可以在同一个集群上同时使用 CeleryExecutor 和 KubernetesExecutor。CeleryKubernetesExecutor 将查看任务的 queue 来决定是在 Celery 还是 Kubernetes 上运行。默认情况下,任务会发送到 Celery worker,但如果你想使用 KubernetesExecutor 运行任务,则将其发送到 kubernetes queue,它将在其自己的 pod 中运行。无论你使用哪种执行器,KubernetesPodOperator 都可以达到类似的效果。
容错
提示
要排除 KubernetesExecutor 的问题,你可以使用 airflow kubernetes generate-dag-yaml 命令。此命令会生成在 Kubernetes 中将要启动的 pod,并将其输出到 yaml 文件供你检查。
处理 Worker Pod 崩溃
在处理分布式系统时,我们需要一个假定任何组件在任何时候都可能因 OOM 错误到节点升级等原因而崩溃的系统。
如果 worker 在向后端 DB 报告其状态之前死亡,执行器可以使用 Kubernetes watcher 线程来发现失败的 pod。

Kubernetes watcher 是一个线程,可以订阅 Kubernetes 数据库中发生的每一个变化。当 pod 启动、运行、结束和失败时,它会收到警报。通过监控此流,KubernetesExecutor 可以发现 worker 已崩溃,并正确地将任务报告为失败。
但是调度器 Pod 崩溃怎么办?
在调度器崩溃的情况下,调度器将使用 watcher 的 resourceVersion 恢复其状态。
当监控 Kubernetes 集群的 watcher 线程时,每个事件都有一个单调递增的数字,称为 resourceVersion。执行器每次读取 resourceVersion 时,都会将最新值存储在后端数据库中。由于存储了 resourceVersion,调度器可以重新启动并从上次中断的地方继续读取 watcher 流。由于任务独立于执行器运行并直接向数据库报告结果,调度器故障不会导致任务失败或重新运行。